Authentication flows
This section will cover the authentication flows for logging in with a passkey.
By the end of this section you will understand how to use both of the /assertion/options and /assertion/result methods (as defined by our API) to implement a webpage that allows a user to authenticate with a passkey
Flow overview
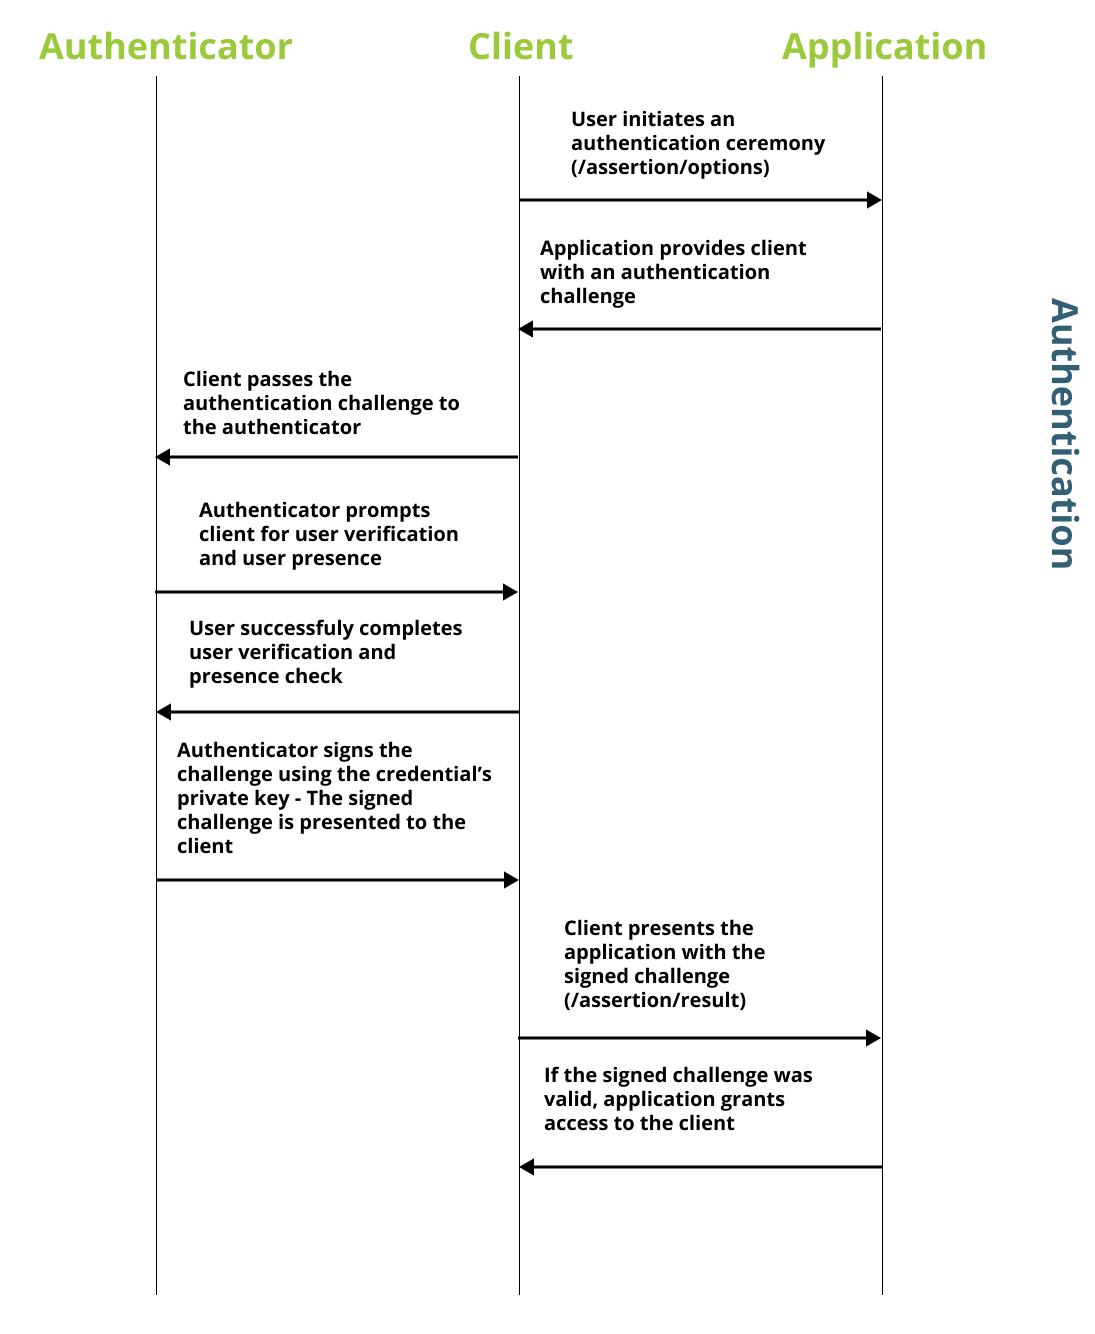
The diagram below demonstrates how the relying party works with the client, and authenticator to authenticate with a passkey. When interacting with the relying party, the client will leverage both of the /assertion methods.
The first call (/attestation/options) is used to receive an object that includes the options/configurations that should be used when creating a new credential.
The second call (/attestation/result) is used to send the newly created passkey to be stored in the relying party.
As demonstrated in our section on user flows, there are multiple flows that can be used for authentication with a passkey. This guide will cover all three methods, and one additional flow that will allow you to combine all three.
Event handler
We will start be declaring a method that will be used to handle both of the discoverable and non-discoverable credential flows.
import PasskeyServices from "../../services/PasskeyServices";
import { get } from "@github/webauthn-json";

const [username, setUsername] = useState("");

const authenticateUser = async () => {
  try {
    /**
     * Assume the username is a variable that defaults
     * as empty (""), or can be changed through
     * an input field by the user
     */
    const assertionOptions = await PasskeyServices.getAssertionOptions(
      username
    );

    /**
     * Attempt to get the assertion using the auth
     * options
     */
    const assertionResult = await get(assertionOptions);

    /**
     * Send the assertion to the RP
     */
    const authenticationResult = await PasskeyServices.sendAssertionResult(
      assertionOptions.requestId,
      assertionResult
    );

    /**
     * Validate that the key was created
     * Otherwise display a message
     */
    if (authenticationResult.status === "ok") {
      console.info("Authentication successful");
    } else {
      throw new Error("Auth failed");
    }
  } catch (e) {
    console.error(e.getMessage());
  }
};
Usernameless discoverable credential flow
This flow will allow a user to authenticate with a passkey, without providing an identifier/username. This flow is commonly referred to as usernameless.
The video below will demonstrate this flow.
The user interface items for usernameless passkey authentication is fairly simple; it's just a single button!
The user will click this button to begin the authentication ceremony. The button will trigger an 'onClick' event that will handle the authentication ceremony.
Because the global username has been set to empty by default, the call to authenticateUser will pass an empty userName field to the RP, indicating the use of a discoverable credential flow.
<Button onClick="{authenticateUser}">Add a new passkey</Button>
Username non-discoverable credential flow
We will continue to expand the flow above to account for users with non-discoverable credentials.
The video below will demonstrate this flow.
Non-discoverable credentials require the presence of a username as the RP needs to pass assertion options with an allowCredentials list, as the authenticator needs to be explicitly told the credentials to utilize to complete this ceremony.
We will start by adding an input field for the username, and a handler that will update our global username field.
const [username, setUsername] = useState("");

const onUsernameChange = (e) => {
  setUsername(e.target.value);
};

<Form>
  <Form.Group>
    <Form.Label>Username</Form.Label>
    <Form.Control value={username} onChange={onUsernameChange} />
  </Form.Group>
</Form>;

/**
 * This is the same button created in the previous section
 */
<Button onClick="{authenticateUser}">Add a new passkey</Button>;
The great thing about this implementation is that the button can work for both discoverable and non-discoverable credential flows.
If the username field contains input from the user, the button will invoke a non-discoverable credential flow.
If the username field is empty, the button will invoke a discoverable credential flow.
Our goal is to demonstrate that it's not difficult to make your application usable by ALL types of WebAuthn authenticators.
As mentioned earlier in this guide, passkeys (discoverable credentials) can be utilized from a non-discoverable credential flow.
Keep in mind, non-discoverable credentials cannot be used from discoverable credential flows
Autofill flow
Autofill introduces a new paradigm into the traditional "modal" flows that we have demonstrated in previous sections. This allows a user to select a passkey from a dropdown list on the username field, similar to what is done currently with passkeys.
The video below will demonstrate this flow.
The flow we demonstrated above was done using Touch ID on a MacBook. This flow is not only specific for platform authenticators, and can allow for the use of passkeys on security keys (as supported by the platform)
The use of autofill will require a few different mechanisms in the code, as there are some new properties and requirements that are non-standard to the traditional modal flows.
We will begin by implementing an autofill method in isolation, then demonstrate how it can be integrated with the previous modal flows shown on this page.
Checking if autofill is available
In an autofill flow, the first thing that your client should do is check if autofill is available on your platform, more specifically your browser.
As autofill for passkeys is a relatively new feature, it may not yet be implemented in your platform of choice.
You can use the method below to verify if your browser has autofill. Note the use of the name conditional mediation, which is another term used to describe autofill in a passkey context.
/**
 * This method call is a promise, be sure to utilize
 * async in Javascript to get the response
 */
window.PublicKeyCredential.isConditionalMediationAvailable();
In an ideal world, this method could work across any browser, but as with autofill this method may not be available. We can extend this method call further to check if this method is available, and the result of the method call if it is. We can assume that if this method is not present, then neither is autofill.
const mediationAvailable = async () => {
  const pubKeyCred = window.PublicKeyCredential;
  if (
    typeof pubKeyCred.isConditionalMediationAvailable === "function" &&
    (await pubKeyCred.isConditionalMediationAvailable())
  ) {
    return true;
  } else {
    return false;
  }
};
Handle autofill request
When using autofill there are properties in the get method parameters that deviate from the standard modal experience. We need to:
- Invoke the WebAuthn
getceremony as soon as the user enters the webpage - Append additional information to the object that is passed into the
getmethod. - Create an abort controller object that can terminate the autofill request (more on this below)
- Add the autofill property to the username input field
The code sample below will demonstrate methods that can be used to handle the autofill request.
import PasskeyServices from "../../services/PasskeyServices";
import { get } from "@github/webauthn-json";

const [authAbortController, setAuthAbortController] = useState(
  new AbortController()
);

const passkeySignIn = async () => {
  try {
    /**
     * Call to RP to initiate a
     * discoverable credential flow
     */
    const assertionOptions = await PasskeyServices.getAssertionOptions("");

    /**
     * Ensure that you set
     * mediation to conditional
     * signal to your abort controller
     */
    const assertionResult = await get({
      publicKey: assertionOptions.publicKey,
      mediation: "conditional",
      signal: authAbortController.signal,
    });

    /**
     * Send the assertion to the RP
     */
    const authenticationResult = await PasskeyServices.sendAssertionResult(
      assertionOptions.requestId,
      assertionResult
    );
  } catch (e) {
    console.error(e);

    /**
     * If the WebAuthn get ceremony is cancelled
     * then create a new abort controller
     */
    setAuthAbortController(new AbortController());
  }
};

/**
 * This method should be called as soon
 * as the user enters the page
 * In React, this will commonly be the
 * useEffect method
 */
const onPageLoad = async () => {
  if (
    (await mediationAvailable()) &&
    authAbortController.signal.aborted === false
  ) {
    await passkeySignIn(authAbortController);
  }
};
/**
 * Ensure that the input field has the
 * autoComplete property with "username webauth"
 * as the value
 */
<Form>
  <Form.Group>
    <Form.Label>Username</Form.Label>
    <Form.Control
      value={username}
      onChange={onUsernameChange}
      autoComplete="username webauthn"
    />
  </Form.Group>
</Form>;
Abort controller
Note the use of an abort controller in the method above. The abort controller acts as a mechanism to terminate the active autofill request.
This is important as most of the mainstream browsers will only allow one active WebAuthn request at a time. So while autofill is active, your user may be unable to invoke other authentication flows, or registrations of new passkeys
Cancelling the autofill request OR calling the abort controller will terminate the passkeySignIn method.
You can reinvoke the passkeySignIn method, just be sure to instantiate a new abort controller, otherwise the get method will fail immediately if you attempt to use an abort controller that has been used.
Combination flow
Finally let's put this all together and create a single sign-in webpage that can handle all three of these flows.
This will be a combination of the methods listed above with some slight modifications.
Below you will find the full implementation of a combination page.
import PasskeyServices from "../../services/PasskeyServices";
import { get } from "@github/webauthn-json";

const [authAbortController, setAuthAbortController] = useState(
  new AbortController()
);

const authenticateUser = async () => {
  try {
    /**
     * Kill any current autofill request using the
     * abort controller
     * This will allow the non-autofill, modal
     * request in this method to trigger
     */
    authAbortController.abort();

    /**
     * Assume the username is a variable that defaults
     * as empty (""), or can be changed through
     * and input field by the user
     */
    const assertionOptions = await PasskeyServices.getAssertionOptions(
      username
    );

    /**
     * Attempt to get the assertion using the auth
     * options
     */
    const assertionResult = await get(assertionOptions);

    /**
     * Send the assertion to the RP
     */
    const authenticationResult = await PasskeyServices.sendAssertionResult(
      assertionOptions.requestId,
      assertionResult
    );

    /**
     * Validate that the key was created
     * Otherwise display a message
     */
    if (authenticationResult.status === "ok") {
      console.info("Authentication successful");
    } else {
      throw new Error("Auth failed");
    }
  } catch (e) {
    console.error(e.getMessage());

    /**
     * Re-trigger the autofill request method
     */
    passkeySignIn();
  }
};

const passkeySignIn = async () => {
  try {
    /**
     * Call to RP to initiate a
     * discoverable credential flow
     */
    const assertionOptions = await PasskeyServices.getAssertionOptions("");

    /**
     * Ensure that you set
     * mediation to conditional
     * signal to your abort controller
     */
    const assertionResult = await get({
      publicKey: assertionOptions.publicKey,
      mediation: "conditional",
      signal: authAbortController.signal,
    });

    /**
     * Send the assertion to the RP
     */
    const authenticationResult = await PasskeyServices.sendAssertionResult(
      assertionOptions.requestId,
      assertionResult
    );
  } catch (e) {
    console.error(e);

    /**
     * If the WebAuthn get ceremony is cancelled
     * then create a new abort controller
     */
    setAuthAbortController(new AbortController());
  }
};

/**
 * This method should be called as soon
 * as the user enters the page
 * In React, this will commonly be the
 * useEffect method
 */
const onPageLoad = async () => {
  if (
    (await mediationAvailable()) &&
    authAbortController.signal.aborted === false
  ) {
    await passkeySignIn(authAbortController);
  }
};
/**
 * Ensure that the input field has the
 * autoComplete property with "username webauth"
 * as the value
 */
<Form>
  <Form.Group>
    <Form.Label>Username</Form.Label>
    <Form.Control
      value={username}
      onChange={onUsernameChange}
      autoComplete="username webauthn"
    />
  </Form.Group>
</Form>;
/**
 * This is the same button created in the previous section
 */
<Button onClick="{authenticateUser}">Add a new passkey</Button>;
Hybrid flows
There is not any specific implementation that needs to be done to enable hybrid authentication. The option to leverage hybrid will always be presented to the user in the modal/autofill menus.